Thank you for reading and your continued support. I wrote this post after several drywall mishaps and witnessing sloppy methods from contractors.
Drywall was first made by the U.S. Gypsum Company (USG) in 1916 and introduced as an alternative for lath and plaster. Initially it was called "Sackett Board," after the Sackett Plaster Company which USG acquired. Sheetrock is the trademarked name for USG’s drywall but it is also commonly known as plasterboard, wallboard, gypsum board and gyprock. Sheetrock is manufactured in the same way as other drywall other than some unique chemicals. Today there are multiple brands like American Gypsum, CertainTeed etc. that each produce different kinds of drywall.
How is drywall made
Drywall consists of a core of wet gypsum plaster pressed between two thick sheets of paper or fiberglass mats. Gypsum is a naturally occurring sulfite mineral found in gray, white, or pink sedimentary rock. When gypsum is crushed and heated to remove 75% of its water content, it is known as Plaster of Paris or calcined gypsum. The core of drywall is composed of ground gypsum crystal (calcium sulfate dihydrate), fiber, a foaming agent, additives (like starch, paper pulp, etc.), and an emulsifier or thickener, which are all blended with water to form a thick paste. The paste is spread onto paper, and then another sheet of paper is laid on top. The assembled unit is then heated to temperatures up to 500 degrees Fahrenheit, which dries the material out and prepares it for cutting.
The plaster core in the drywall is what makes it heavy. Plywood weighs roughly 2 pounds per square foot, while drywall weighs 2.75 pounds per square foot. A 1/2" sheet of drywall can weigh almost 60 pounds but the newer lightweight drywall is about 20 pounds lighter.
Drywall installation is straightforward, but as usual, my project went sideways.
We had water issues, uneven walls and ceilings, shoddy taping, and the usual contractor shadiness that I have become accustomed to.
Unbeknownst to me, an entire bathroom had been rotting for months.
In previous posts, I have mentioned that most of my walls are plaster. Despite multiple water-related issues, the plaster walls consistently dried out as they are designed to do so. Wet drywall didn’t fare so well. One of the bathrooms where both green board (drywall) and cement board (backer board) were installed was exposed to water for months, but I wasn’t aware of the issue as there was nothing visible. By the time it was discovered, the boards had completely deteriorated and there was copious amounts of mold underneath. Needless to say the whole room had to be gutted. Technically, one should use a cement backer board for tile and green board is a suitable board for moisture-prone areas, but neither is going to survive a prolonged bout with moisture.

The drywall and cement board in the bathroom were framed against an exterior CMU wall (concrete masonry unit, commonly called a concrete block). The block wall had been poorly constructed, and there were gaps between the blocks where the mortar was either poorly applied or missing. The blocks were also not filled, which allowed water to pass through. There wasn’t a water-resistive vapor barrier applied to the wall which could have slowed the passage of water vapor to reduce condensation. Lastly, the foundation of the wall had also not been waterproofed, exacerbating the issue.
If drywall is exposed to water for a short period of time (usually less than 48 hours), it may be possible to dry it out. If it is exposed for a longer period of time, it will need to be replaced. The materials used to make drywall, such as gypsum, paper, and organic additives and binders, all react with water in such a way that their chemical composition is altered. Gypsum turns into a paste when it gets wet, and drywall will crumple. Paper facings and additives also react to water and can get moldy. Water can also dislodge the tape used to cover drywall seams or soften the panels at the screws. Water plus drywall is a mushy disaster waiting to happen.
The bathroom must have had moisture issues prior to the the board installation, but the contractor either did not notice or care. Luckily, we discovered the issues before the tile and finishes were installed, otherwise the tile would have fallen off which would have been expensive and dangerous.
In retrospect, filling masonry seams and waterproofing may seem like common sense and obvious…but it is shocking how often these practices are not followed. It’s also not as uncommon as one might expect. I read an article recently in the Construction Specifier1 that mentions issues similar to what I encountered where gaps in masonry allowed water infiltration. While I only highlighted the concrete gaps in the example above, I also had a seepage similar to the example (below right).
Tips:
There should be no open seams on exterior masonry or in transitional areas such as where the wall meets the roof.
Concrete is porous and should be treated with a water repellent on the outside and a vapor barrier on both sides.
Foundations should be waterproofed (and insulated in cold climates), as otherwise the water can both enter or go up the wall through capillary action.
If the mortar is too hard it will crack when the masonry shifts, so ensure the mortar is appropriate for the masonry. Prior to sheetrock installation, check the wall for dampness and have the contractor hose it down with water from above and/or outside to test whether there are gaps. Wait for rain to make sure water isn’t entering through any exterior walls. Monitor through several weeks of rainfall to be safe.
If you have space, insulate the wall inside (and outside if needed) before the final finishes are applied.
You can’t put lipstick on a pig.
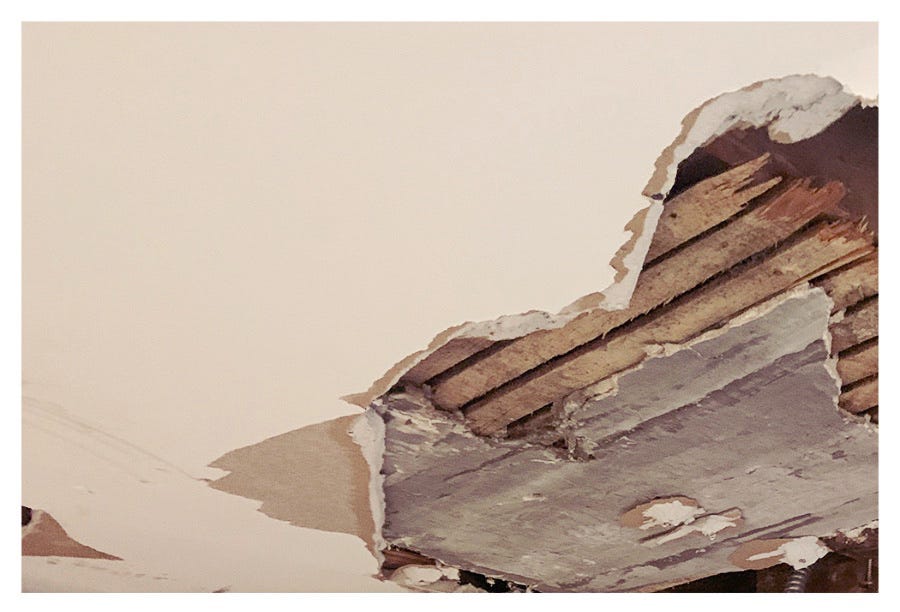
Drywall isn’t a cure for poor framing or joist imperfections. Prior to installing drywall, instead of cleaning old plaster and tin pieces from my ceiling, my contractor tried to shim areas to line up, a hack effort that left an uneven and bumpy surface. It was a sad and futile cover up of a fundamentally flawed approach.
Tips: Before a ceiling or floor is drywalled, make sure the joists or framing doesn’t have extraneous materials on it. Next, ensure the joists are level, as in old houses they can sink, sag, or get displaced. If it is a framed wall, make sure it’s in a straight line side to side and top to bottom. Once the drywall has been installed, use a flashlight to look for imperfections and use a level again. Check with the flashlight again after taping and sanding.
Some contractors will drill through wood joists to route pipes and electrical wiring. If you have the ceiling open, it’s a good time to see if these can be rerouted and any compromised joists can be repaired or reinforced. Newer galvanized joists and studs have perforations to run wires.
Installing sheetrock and taping is not time-consuming work
A common contractor ploy is to make work seem more time-consuming so they can try to overcharge clients. For example, a contractor that leveled a ceiling that was approx. 175 square feet attempted to bill me $3000 for several hours of work. The sheetrock installation would have taken less than an hour, followed by taping, joint compound, and sanding, which is probably another several hours at best. Most of the time is drying time in between coats when a contractor usually does other work.
You can see how long the process takes:
Home Depot: How To Tape and Mud Drywall (video)
USG Sheetrock Install Guide (pdf)
Badly taped seams with bumps should not be accepted as ‘complete’.
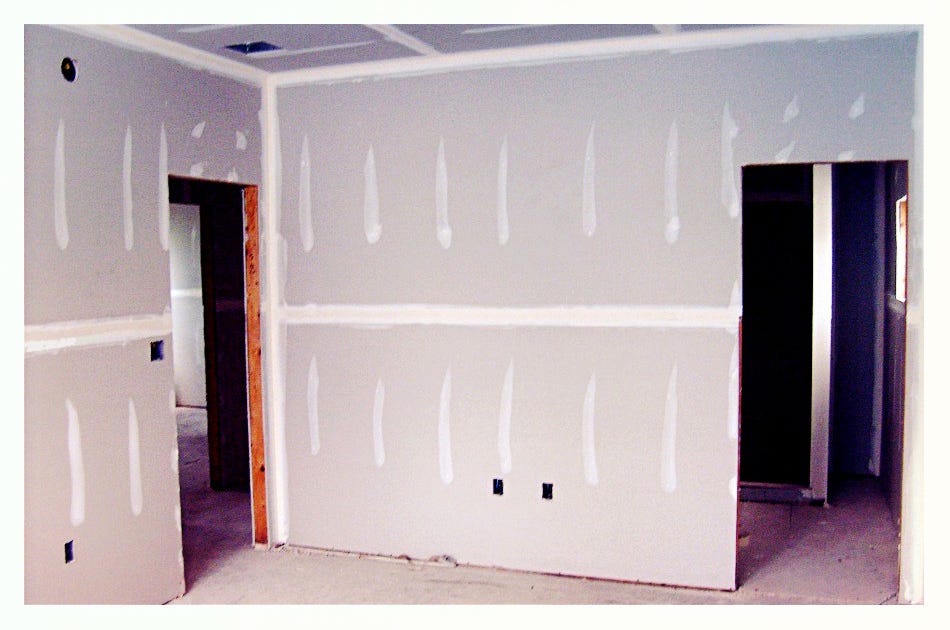
Badly taped seams are a problem but compared to water or leveling issues, they are resolved easily. According to my contractor, he was done taping the wall below. I wouldn’t call this done because the wall hasn’t been sanded smooth or plastered. I’ve learned that if you pay for incomplete work, the rest may never get done. Many contractors will promise to complete unfinished work later, but most will not follow through. Invariably you’ll end up hiring someone else and paying again.

A properly completed drywall installation will have
Invisible joints, nails and/or screw holes
No cracking bumps, angles or creasing and the overall texture is smooth
Corners will be smooth with no gaps
Drywall and joint compound seem like innocuous materials but are unsafe.
Drywall and joint compound can have talc, calcite, mica, gypsum, silica, formaldehyde, and even mercury, which are toxic. Cutting drywall and sanding joint compound can expose you to harmful chemicals in the dust, so there should be appropriate ventilation and protection equipment used. Long-term exposure to materials like silica can cause cancer or lung issues. Most premixed joint compounds contain harmful biocides2 (See Repository) like tributyltin, which is an endocrine disruptor and is toxic to marine life.
Tip: Powdered joint compounds which has to be mixed are less likely to contain biocides, but protection should be used while mixing to avoid inhalation or other harmful substances.
What to look for in the labels
Made in the U.S., 2016 or later
Greenguard certified
No biocides (common in mold-resistant drywall)
Biocides refer to a wide range of chemicals whose primary purpose is to kill or control harmful organisms like microbes, viruses, mold, etc. But biocides can be harmful if these organisms develop resistance. This can also create antibiotic-resistant strains.No- or low-VOC joint compounds
VOCs are a class of chemicals that begin to vaporize under typical indoor temperature and pressure conditions. Common VOCs include benzene, formaldehyde, toluene, flammable alcohols, household cleaning solvents, gasoline, and other liquid combustion fuels. VOCs are present in paint, carpet, air fresheners, makeup, and even magazines. Ideally, you want to list exposure as harmful to health as well as polluting the air.No formaldehyde or acetaldehyde, which are both carcinogenic.
Avoid boards made of synthetic gypsum, which is made from coal waste. Prolonged or repeated exposure can damage the lungs and respiratory system and may cause cancer.
Non-toxic Drywall Alternatives
Drywall, which makes up 15% of construction waste, leaches toxins and releases hydrogen sulfide gas in landfills. See post ‘Get Plastered’ for a list of green alternatives.
Backer board and Veneer Plaster
Backer board
Backer board, also called cement board is often used in wet areas like kitchens and bathrooms as a tile backing in place of drywall. Backer board is made of cement, water, silica, limestone flour, and reinforcing fibers like fiberglass for strength. Unlike drywall, it has no organic material, so it is less prone to mold, rot, or decomposition. It can be nailed or screwed, just like drywall. It comes in smaller 3 x 5 ft sheets (drywall comes in 4 x 8 ft sheets and up). Like drywall, it comes in different thicknesses for different applications. Commonly used backer boards are Durock and Fiberrock.
Veneer Plaster
Veneer plaster is a technique used to make drywall look like plaster. Usually this is blue board with a very thin, 1/8-inch layer of plaster applied on top. Look for blue board or ToughRock.
Related content:
Get Plastered
Historical plaster has significance and tradition, and it’s important to have an understanding of the advantages and disadvantages to make sound decisions.
Thank you for reading. If you like this post, please share or heart it.
Queen’s Repository
Types of drywall
There can be confusion about what type of drywall to use, so it’s important to be informed.
Standard drywall or white board
This is the most common type of drywall used on walls and ceilings in both residential and commercial projects. The sheet size is 4’ x 8’ but can be obtained in longer lengths or smaller sizes such as 2’ x 2’. It is also available as sustainable panels.
Lightweight Drywall
Lighter drywall has been available for over a decade now. The USG brand is Sheetrock® Ultralight, which comes in sag- and moisture-resistant panels.
Tip: It also comes in a fire-rated version called Sheetrock® Brand UltraLight Firecode 30® and an Ultralight Type X which is 1-hour fire-rated.
Paperless drywall
Paperless drywall is covered with fiberglass facings instead of paper. This is an option for your kitchen and bathrooms. Paperless drywall is easier to cut, but the finishing effort is greater because it has a rougher texture. DensArmor Plus (made by Georgia-Pacific) is a brand of paperless drywall.
Tip: Cutting it releases fiberglass, so use protection. Clothing should cover skin and wear a mask. Use mold-resistant mud, fiberglass tape (vs. paper tape), and vinyl corner beads.
Blueboard (blue in color)
Blueboard is often used as a backing for veneer plaster because it is more absorbent and durable. The paper facing on this kind of drywall is designed for the plaster finish to adhere better, and overall, you get a smoother finish relative to regular drywall. It’s also good for soundproofing, and there are fewer finishing steps, but the dry time for plaster is longer.
Tip: Use this when you are adding drywall to partial areas in a plastered wall. Make sure it's fully cured (1-2 weeks) before paint is applied.
Greenboard (green in color and moisture-resistant)
Greenboard has a thicker, paperless backing that is wax-coated for moisture resistance. It is commonly used in bathrooms, kitchens, and laundry rooms. Even though it has a higher water resistance than drywall, it can still be susceptible to mold. It is not meant to be fire-retardant. While it can be used in a bathroom or kitchen, for tile it is better to use cement board.
Tip: Use mold-resistant mud and fiberglass tape (vs. paper tape) to seal the joints; otherwise, you'll be negating the effect of installing green board.
Purple Drywall (purple in color and mold-resistant)
Purple drywall is similar to green drywall but has higher mold and mildew resistance. It can be used in all wall and ceiling applications, especially where enhanced moisture and mold resistance are desired. The paper finish is 100 percent recycled paper for better durability against water. The boards are scratch and dent resistant which also makes them a good choice for high-traffic areas.
Soundproof drywall
While all drywall has some soundproofing qualities, soundproof drywall adds additional wood fiber, gypsum, and polymers to increase the sound transmission class (STC), which makes it superior to regular drywall when it comes to blocking sound. It is denser than regular drywall and can be more difficult to work with.
Tip: Use soundproof drywall on party walls and to separate private areas such as bedrooms from common areas. Instead of using soundproof drywall, you can also use regular drywall with sound proofing insulation.
Type- X, Type C and Firecode 30 (fire-resistant drywall)
Type X drywall is 5/8"thick and has a fire-rating of an hour, double the 30 m rating for standard ½-inch drywall. It has a denser core and contains glass fibers to prevent it from breaking down in a fire. The denser core also makes it sound It can be used in multiple layers to provide greater protection if needed. Type C is the same as Type X but doesn’t shrink when burned. It’s used primarily on ceilings to keep them from collapsing during a fire.
Tip: Check your Building code to see what may be required but remember that fire resistant drywall only slows the spread of a fire. The same material may release toxic substances and most people die from inhalation.
Common sizes and thicknesses of drywall
There are three common size options:
4’ x 8 drywall: The most common and versatile, it allows for either vertical or horizontal installation.
4’ x 10’ drywall: Use for tall walls and wide ceilings.
4’ x 12’ drywall: The longest length available for high ceilings, so you get more coverage using fewer panels.
The most common thicknesses of drywall are 1⁄4” 1⁄2” and 5⁄8” and these sizes are used in a majority of walls in residential and commercial construction. Multiple layers can be installed in rooms or areas that need more protection.
1⁄4” Thinnest board; can be used on curved walls and it can be more flexible when wet
1⁄2” Standard thickness used in walls and ceilings
3⁄8” Used for partitions and patching
5⁄8” Used in walls and ceilings for an hour fire-rating
Tip: If you have a large project, you can use lightweight drywall, which is actually stronger and weighs less, which is a plus, especially for ceilings where drywall can sag from the weight. When suitable, buying longer lengths will make the job faster as there will be fewer seams to tape.
Calculating the amount of drywall needed
Estimate the amount you need by calculating l (length) x h (height) OR (width). Subtract the square footage of openings such as doorways and windows. Don’t bother with small openings, such as electrical boxes, etc. Do the same for the ceiling.
Total and then divide the square footage by
32 for 4’ x 8’panels
48 for 4’ x 12’panels
If you like Architecture, please follow my Instagram.
Construction Specifier: Durable Waterproofing for Concrete Masonry Walls: Redundancy required
ICL: What are biocides





To write about such technical issues in
simple language and thus make it accessible
to a common reader is no mean achievement.
And felicity in writing is a major plus point
This was a great read!
I am wall and ceiling fixer by trade (a gyprocker) from Australia and I loved your summation of the many hiccups that can come with gyprocking.
I also just thought it was cool that someone wrote about gyprock - I’ve been writing for ages and working with gyprock for even longer. And writing about it had never even occurred to me.